Adapting the Bitwarden CLI with Shell Scripting
Bitwarden has been my password manager of choice since it was recommended to me by Frank about two years ago. I like most of its functionality. However, one thing kept annoying me. To be honest this was already the case with my previous password manager.
The integration of Bitwarden into the browser is great. When I'm not in the browser the interaction with Bitwarden often felt cumbersome. For example, I quite often work or in a virtual machine running Windows1 or in the terminal in full screen mode. In order to get a password from Bitwarden when I'm not in the browser I need to do the following steps:
- Switch to the browser
- Click on the Bitwarden icon
- Enter the master password (in most of the cases)
- Enter a search string
- Click on the icon to copy the password
- Switch back to my work environment.
Especially, when working in the terminal, the need to suddenly switch to using the mouse annoyed me.
Bitwarden CLI
One of the nice features of Bitwarden is, that there is also a command-line interface available. I had a look at this CLI a few weeks back, but I did not find it useful. With the ID of an entry in my vault the Bitwarden CLI would allow me to look up the password using
bw get password <ID>In order to get the necessary ID I could use
bw list items <search-string>However, the bw list items command returns a JSON string
containing all the information of the entries matching the
<search-string>. In particular, I didn't see an easy way to
get the ID from the results and use it to get the password. So
after playing with the CLI for about half an hour, I gave up.
Shell Scripting to the Rescue
A few days ago I read the blog post Bringing the Unix Philosophy to the 21st Century by Kelly Brazil (found via @qmacro of cause). After reading this post i thought: "hold up, wait a minute". The Bitwarden CLI returns JSON. I have already used command-line tools jq and fzf a bit. It should be possible to adapt the Bitwarden CLI to my needs with those tools.
Of course, being a good software developer, I started with a Web search first. And, surprise, I found a blog post by Ben Aaron Goldberg that describes almost exactly what I wanted to have. Using this blog post as a basis I was sure I could create the CLI for Bitwarden that I needed.
My Requirements
What features did I want to have in my bespoke Bitwarden CLI?
- I want to be able to search for usernames and passwords using a search string
- If only one entry is found, first the username and after that the password
for the entry should be copied to the clip board.
- If more than one entry is found I want to be able to search through the
results and select the entry I was looking for. After that the username and password should again be copied to the clip board.
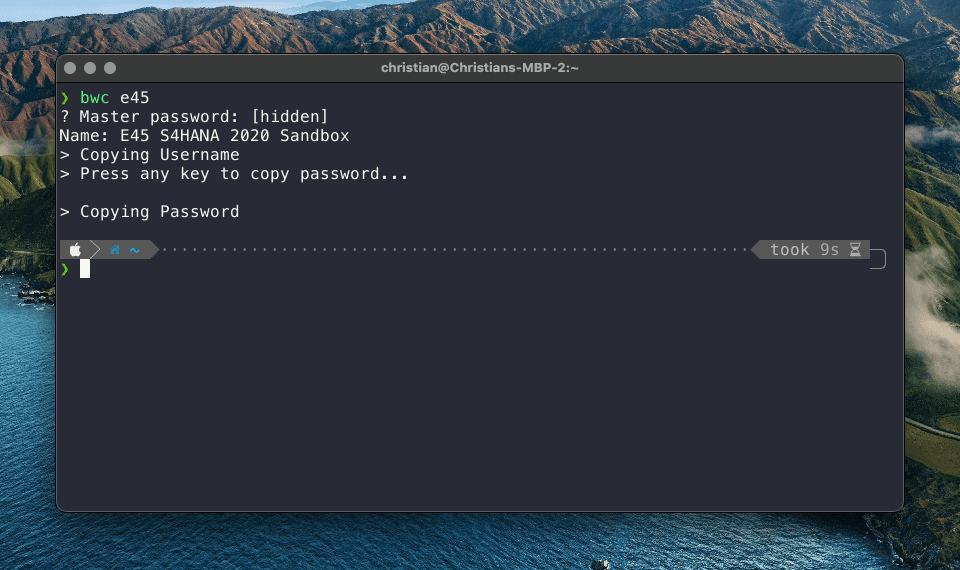
The following screenshot shows what I had in mind for the CLI.
My Solution
My requirements didn't sound overly complicated. So I stared building a shell script implementing them. This is what I came up with after quite some trial and error. I created a shell script called bwc - a mnemonic for Bitwaren Copy.
set -e

copy_uname_and_passwd () {
  # Print the name of the selected login
  echo "Name: $(printf "%s" "$1" | jq -r ".name")"
  echo "> Copying Username"
  # Copy the username to the clipboard
  printf "%s" "$1" | jq -r ".login.username" | pbcopy
  echo "> Press any key to copy password..."
  # Wait for user input before coping the password
  read
  echo "> Copying Password"
  # Copy the password to the clipboard
  printf "%s" "$1" | jq -r ".login.password" | pbcopy
}


# Search for passwords using the search term
logins="$(bw list items --search $1)"

if [ $(printf "%s" "$logins" | jq ". | length") -eq 1  ]
then
  login="$(printf "%s" "$logins" | jq ".[0]")"
else
  name="$(printf "%s" "$logins" | jq -r ".[].name" | fzf --reverse)"
  login="$(printf "%s" "$logins" | jq ".[] | select(.name == \"$name\")")"
fi

copy_uname_and_passwd $login
Lines 3 - 15 are mostly copied from the blog post mentioned above. The only thing I did was wrapping it in a function that I could reuse.
The execution of the script starts in line 19. The Bitwarden CLI
is used to search for items using the search term passed to the
script as a parameter. The result is stored in the variable logins.
Next, the length of the resulting JSON array is calculated using
jq ". | length". If only one entry is found, this entry is stored
in the variable login (line 23). If more than one entry is found
the names of these entries are passed to fzf. The name of the
selected entry is stored in the variable name. This variable is used
line 26 to get the selected login from the result array logins and
store it in the variable login.
Finally, the function copy_uname_and_passws is called with the
login as a parameter.
The following two GIFs show the script in action. First, with only one result returned from the search:
Second, with multiple results returned by the search:
Be careful with echo
One of the problems I was facing during development of the script was this error message from jq:
parse error: Invalid string: control characters from U+0000 through U+001F must be escaped at line 6, column 13After lots of trial and error I noticed the problem was the echo I was
using in the script. echo does some special handling of
characters like \n.
For example, initial line 21 contained the following code:
$(echo $logins | jq ". | length")Due to the special handling of \n the JSON piped from echo to jq was not valid. Once
I changed echo to printf everything worked as expected.
Summary
I now have exactly the Bitwarden CLI I was looking for. Furthermore, creating the shell script showed me, again, the power of the Unix philosophy of having a program do exactly one thing and do this well.
As this is my first shell script I'm sure there my things to improve. I would be happy to hear any suggestions by some of the command-line and shell scripting magicians 🧙♀️ out there.
1 This is due to the fact that VMware doesn't have a working version of its proprietary VPN solution for any recent MacOS.↩